DIY Cleaning Hacks for End of Tenancy

Last modified on: 14/08/2024

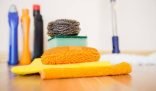
Are you worried about cleaning your rental before you leave? Don’t be! We have some amazing DIY cleaning hacks to help you. These tips will make cleaning easy and save you money. Say hello to a clean home without spending a lot.
Cleaning your rental well is key to getting your deposit back. It also makes it easier for the next people moving in. We’ll show you how to clean everything from ovens to baseboards. You’ll get all the tips and tricks you need for a spotless home.
Key Takeaways:
- DIY cleaning hacks can make end of tenancy cleaning a breeze and save you money.
- Cleaning your rental property thoroughly ensures a smooth transition for the next tenants and helps you get your deposit back.
- We will guide you through cleaning different areas of your rental property, including ovens, countertops, tiles, showers, surfaces, carpets, windows, walls, and baseboards.
- We will also explore eco-friendly cleaning alternatives for those looking to minimize their environmental impact.
In this article:
- Key Takeaways:
- Why DIY Cleaning for End of Tenancy?
- Benefits of DIY Cleaning
- Common Challenges and How to Overcome Them
- Sparkling Clean Ovens
- Baking Soda and Vinegar Method
- Lemon and Salt for Stubborn Stains
- Gleaming Countertops and Sinks
- DIY Granite Cleaner
- Natural Sink Unblocker
- Shiny Tiles and Grout
- Baking Soda Paste
- Vinegar Spray for Mildew
- Sparkling Showers and Bathtubs
- Dish Soap and Vinegar Solution
- Removing Soap Scum with Lemon
- Dust-Free Surfaces
- Microfiber Cloths for Dusting
- DIY Furniture Polish
- Carpet and Upholstery Freshness
- Baking Soda and Essential Oils
- Homemade Upholstery Cleaner
- Windows and Mirrors
- Walls and Baseboards
- Magic Erasers
- DIY Wall Cleaner
- Eco-Friendly Cleaning Alternatives
- Benefits of Green Cleaning
- Easy DIY Eco-Friendly Cleaners
- Conclusion
Why DIY Cleaning for End of Tenancy?
When your tenancy ends, making sure the place is clean is key. It meets your landlord’s needs and ensures you leave the property well. DIY cleaning has many benefits you should consider.
Benefits of DIY Cleaning
DIY cleaning gives you a sense of pride and control. You know every corner is spotless. It also saves money. Professional cleaners cost a lot, but DIY lets you spend that money on moving or new furniture.
DIY cleaning lets you pick eco-friendly products. You can choose safe, green cleaners. This makes your cleaning fit your values and help the planet.
Common Challenges and How to Overcome Them
DIY cleaning has its hurdles, like managing time. Cleaning a whole place takes a lot of time, especially if you’re busy. Make a cleaning plan or share tasks with others to stay on track.
Dealing with tough stains is another challenge. But, the right products and methods can fix this. Use special removers or natural cleaners like baking soda and vinegar. Look up the best cleaning tips for different surfaces.
Staying motivated and organized is key. Break tasks into smaller steps. A cleaning checklist keeps you focused and makes sure nothing is missed.
Knowing the perks of DIY cleaning and how to handle challenges helps you clean well. You’ll leave the property spotless.
Need End of Tenancy Cleaning service?
Enter your postcode to view our rates and availability in your area.

Sparkling Clean Ovens
Many of us avoid cleaning ovens because it’s hard and costly. But, you can clean your oven at home with simple methods. These methods can make your oven shine without spending a lot.
Baking Soda and Vinegar Method
Using baking soda and vinegar is a top choice for cleaning ovens. This mix cuts through grease and grime well, leaving your oven clean.
- First, take out the oven racks and set them aside.
- Make a paste with baking soda and a bit of water. It should be spreadable.
- Apply the paste to the oven’s inside with a sponge or cloth. Focus on the greasy spots.
- Let the paste work for a few hours or overnight to break down the grime.
- Wipe the paste off with a vinegar-soaked cloth.
- Use a brush or toothbrush to clean any tough stains.
- Rinse the oven well and dry it.
- Clean the racks with the same method or soak them in hot water and dish soap.
- Once everything is dry, put the oven and racks back in place. Your oven will be sparkling.
This method is not only effective but also safe for you and the planet. It doesn’t use harsh chemicals.
Lemon and Salt for Stubborn Stains
For tough stains, try lemon and salt. Lemon’s acid and salt’s roughness can remove even the hardest stains.
- Squeeze lemon juice on the stained areas of your oven.
- Add salt over the lemon juice to make a paste.
- Let the paste work for at least 30 minutes.
- Scrub the stained areas with a cloth or sponge, being gentle.
- Rinse the oven and dry it.
This method is great for removing food residue and tough grease. Lemon’s acid breaks down grime, and salt helps scrub it away.
With these easy cleaning tips, you can get your oven looking great without harsh chemicals or expensive services. So, get ready, grab your natural cleaners, and make your kitchen oven shine.
You may also enjoy:
Gleaming Countertops and Sinks
Keeping your kitchen and bathroom surfaces clean is key. It keeps them hygienic and makes them look great. We’ll share easy DIY ways to get your countertops and sinks shining.
DIY Granite Cleaner
“Granite surfaces add elegance to any room. They need the right care to stay beautiful. Using harsh chemicals can damage them. So, try a DIY granite cleaner instead. It’s easy to make and safe for your countertops.”
You’ll need these things for the DIY cleaner:
- 1/4 cup of rubbing alcohol
- 1/4 cup of water
- 2-3 drops of dish soap
- A spray bottle
Just mix the rubbing alcohol, water, and dish soap in the spray bottle. Shake it well. Spray on your granite countertops and clean with a soft cloth or sponge. This cleaner removes grease, stains, and fingerprints without harming your granite.
Natural Sink Unblocker
“A clogged sink is a big problem in the kitchen or bathroom. Don’t use harsh chemicals. Try a natural sink unblocker instead. It works well and is good for the planet.”

For this natural unblocker, you need:
- 1 cup of baking soda
- 1 cup of white vinegar
- 1 kettle of boiling water
To clear a clogged sink, pour baking soda down the drain first. Then add white vinegar and let it fizz for 10 minutes. Finally, pour boiling water down the drain to clear out any blockages. If it’s still clogged, repeat the process. This method is safe for most sinks and clears out grease and hair.
Using these DIY cleaning tips will keep your countertops and sinks clean and working well for a long time.
Shiny Tiles and Grout
Tiles and grout often get dirty and stained, looking dull. We’ll show you two easy DIY ways to make them shine again.
Baking Soda Paste
Grout lines can look dirty and discoloured. A baking soda paste can fix this. It’s a natural, cheap way to clean without harm.
- Mix equal parts baking soda and water to make a paste.
- Put the paste on the grout lines and scrub with a toothbrush or grout brush.
- Let it sit for 15-20 minutes to work its magic.
- Rinse with clean water and wipe off any left-over paste.
- For tough stains, add a bit of hydrogen peroxide to the paste.
Using this paste often keeps grout lines clean and bright. It makes your tiles look new.
Vinegar Spray for Mildew
Mildew loves damp places like bathrooms, causing stains and bad smells. A vinegar spray can kill mildew and stop it from coming back.
Put equal parts white vinegar and water in a spray bottle. Spray it on the mildew, wait 10-15 minutes, then scrub with a brush or sponge. Rinse with water to get rid of the vinegar smell.
This spray not only kills mildew but also cleans naturally. It’s great for keeping your bathroom fresh and clean. Using it often stops mildew from coming back.
These DIY methods can make your tiles and grout shine like new. They’re great for removing stains or fighting mildew. These natural cleaners are cheap and good for the planet.
Sparkling Showers and Bathtubs
Keeping your showers and bathtubs clean can be easy and cheap with a DIY approach. The right cleaning solutions and methods can help you clean showers, bathtubs, and remove soap scum. Here are some easy DIY tricks to make your showers and bathtubs shine.
Dish Soap and Vinegar Solution
A mix of dish soap and vinegar is great for cleaning showers and bathtubs. This combo dissolves soap scum, removes grime, and makes surfaces shine.
To make the solution, mix equal parts of dish soap and white vinegar in a spray bottle. Add a few drops of your favourite essential oil for a nice smell. Spray it on your shower and bathtub surfaces and wait a few minutes.
Then, scrub gently with a sponge or brush and rinse with water. This solution will easily remove soap scum, making your showers and bathtubs look new.
Removing Soap Scum with Lemon
Lemon is great for removing tough soap scum. Its natural acidity breaks down soap scum and removes stains. Here’s how to use lemon for cleaning:
- Cut a lemon in half.
- Squeeze the lemon juice on soap scum areas.
- Scrub with lemon halves, applying gentle pressure.
- Rinse with water.
Lemons not only remove soap scum but also leave your bathroom smelling fresh. It’s a natural and green way to clean instead of harsh chemicals.
With these DIY cleaning methods, you can easily get your showers and bathtubs sparkling. Choose between the dish soap and vinegar solution or lemons to keep your bathroom surfaces clean and soap scum free.
Dust-Free Surfaces
Keeping your home clean and fresh means keeping surfaces dust-free. Dust can pile up fast and harm your furniture’s look and health. We’ll share expert tips and a DIY furniture polish recipe to help you keep surfaces clean and furniture shiny.
Microfiber Cloths for Dusting
Microfiber cloths change the game when dusting. They grab dust well, leaving surfaces spotless. Unlike feather dusters or cotton cloths, they don’t spread dust around.

To dust with microfiber cloths, wipe surfaces gently in a sweeping motion. Start at the top and go down, covering all areas. Don’t miss corners or behind objects. Shake or wash the cloth often to keep it working well.
DIY Furniture Polish
For furniture shine, avoid harsh chemicals and try a natural DIY polish. It’s good for the planet and saves money. Here’s how to make your own:
- Mix 1/4 cup of olive oil and 1/4 cup of white vinegar in a bowl.
- Add a few drops of your favorite essential oil (like lemon or lavender) for a nice smell, and stir well.
- Dip a soft cloth into the mix, wring it out, and rub it on your furniture with circular motions.
- Let the polish sit for a few minutes, then buff with a clean microfiber cloth for shine.
This polish cleans and protects your furniture, reducing dust buildup. Always test it on a small area first.
With these dusting tips and DIY polish, you can keep your home dust-free and beautiful. Say hello to a clean and welcoming space.

Carpet and Upholstery Freshness
Carpets and upholstery get dirty and smelly over time. To keep them fresh, cleaning them regularly is key. We’ll look at two natural ways to keep your carpets and upholstery clean.
Baking Soda and Essential Oils
Using baking soda and essential oils is a great DIY way to clean carpets. Baking soda gets rid of bad smells in carpets. Essential oils make things smell nice and fight off germs.
Make your own carpet freshener by mixing one cup of baking soda with 10-15 drops of essential oil. Choose oils like lavender, tea tree, or eucalyptus. Mix well so the oil spreads evenly in the baking soda.
Spread the mix over your carpet, especially where smells are strong. Let it sit for 15-20 minutes. Then, vacuum it all up to get rid of the baking soda and enjoy a fresh smell.
Homemade Upholstery Cleaner
For upholstery, making your own cleaner is as good as buying one, but without harsh chemicals. This easy recipe can clean stains and freshen up your furniture.
Combine one cup of warm water, half a cup of white vinegar, and a bit of mild dish soap. Mix it well. Make sure to use vinegar only on fabrics that can get wet.
Dampen a clean cloth or sponge with the solution. Gently scrub stains with circular motions. Don’t soak the fabric too much. Then, dry it with a clean cloth. Let the furniture dry fully before you use it again.
Using these DIY cleaning tips often will keep your carpets and upholstery clean and long-lasting. This makes your home smell fresh and welcoming.
Windows and Mirrors
Don’t forget to clean your windows and mirrors when you’re tidying up your home. Clean windows and mirrors make any space look better. With the right tools and methods, you can get a streak-free finish. This makes your glass surfaces clear and shiny.
A mix of vinegar and water is great for cleaning windows and mirrors. This simple mix can remove dirt, grime, and smudges well. It leaves glass surfaces crystal clear.

To make the vinegar and water solution, mix equal parts of white vinegar and water in a spray bottle. Shake the bottle well to mix the ingredients. Spray the solution on the glass and clean with a lint-free cloth or a squeegee.
For a streak-free finish, use newspaper instead of a cloth. Newspaper absorbs moisture and stops streaks on glass. Use a crumpled newspaper sheet to clean in a circular motion. Make sure to wear gloves to avoid getting ink on your hands.
This vinegar and water solution with newspaper lets you clean windows and mirrors well. You don’t need harsh chemicals or expensive cleaners for great results.
Walls and Baseboards
Deep cleaning your rental property before moving out includes walls and baseboards. These areas collect dust, dirt, and scuff marks over time. This makes your space look tired and neglected. We’ll look at two ways to clean your walls and baseboards: magic erasers and a DIY wall cleaner.
Magic Erasers
Magic erasers are great for cleaning painted walls. They are made of melamine foam. This sponge texture lifts stains and scuffs without harming the paint.
To use a magic eraser, wet it and squeeze out extra water. Rub it on the stained area gently. The eraser will clean the marks, showing a fresh surface.
But, magic erasers aren’t for all walls. Don’t use them on delicate or textured surfaces. They might scratch or remove the paint. Always test it on a small area first.
DIY Wall Cleaner
For a natural wall cleaner, make your own with household items. This cleaner is effective and won’t cost much.
For the DIY wall cleaner, mix white vinegar and warm water in a spray bottle. Shake it well. Then, spray the solution on a cloth or sponge. Wipe the walls and baseboards where dirt or stains are visible.
Vinegar breaks down dirt and grease and kills germs. It’s safe for most painted surfaces, making it great for DIY cleaning.
Always test the DIY wall cleaner on a small area first. If it causes problems, stop using it.
Regular wall cleaning keeps your rental property looking good. Using magic erasers or your DIY wall cleaner can transform your space.
Eco-Friendly Cleaning Alternatives
More people now want eco-friendly cleaning. It’s good for the planet and our health. Green cleaning uses natural ingredients to clean our homes.
Benefits of Green Cleaning
Eco-friendly cleaning has many benefits. It cuts down on harmful chemicals found in regular cleaners. These chemicals can harm our health, causing breathing problems, skin issues, and allergies.
It also helps the environment. Traditional cleaners can pollute our air, water, and soil. Choosing green cleaning helps protect our natural resources and lowers our carbon footprint.
Plus, green cleaning can save money. You can make your own cleaners with things like vinegar, baking soda, and lemon juice. These items are cheap and easy to find, making them a great choice over expensive store cleaners.
Easy DIY Eco-Friendly Cleaners
Ready to try eco-friendly cleaning? Here are some easy recipes:
- All-Purpose Cleaner – Mix equal parts vinegar and water in a spray bottle. Use it on countertops, floors, and windows.
- Stain Remover – Make a paste with baking soda and water. Put it on the stain, wait a bit, then scrub with a sponge.
- Glass Cleaner – Mix vinegar and water in a spray bottle. Spray on windows or mirrors, then clean with a lint-free cloth or newspaper.
- Air Freshener – Fill a small spray bottle with water and add a few drops of your favorite essential oil. Spray it around your home to make the air smell nice.
These cleaners are safe for you, your family, and the planet. Try them out and see the difference green cleaning makes in your home.
Conclusion
DIY cleaning is a great way to save money and get your rental property spotless. With some clever cleaning hacks, you can make your place shine without spending a lot.
This article has shown how DIY cleaning can help. We’ve shared tips for cleaning everything from ovens to surfaces. These tips make cleaning easier and more effective.
Using things like baking soda, vinegar, and lemon can make great cleaners. They are good for the planet and safe for you. These natural cleaners work well and cut down on harsh chemicals.
If you’re a tenant or a landlord, try these DIY cleaning tips. With a bit of effort and the right methods, you can get your place looking professional. You won’t need to spend a lot on cleaning services or products.
Author: Svetlana Georgieva (Clara)
Hi, I’m Svetlana Georgieva, but you can call me Clara. As the co-founder and heart behind Samyx Cleaning, I’m devoted to sharing the art of a clean space. Let’s journey into a cleaner, more joyful life together with tips from London's cleaning experts.

Discover more of our cleaning secrets: