
How to Clean Extractor Fan Safely: Kitchen or Bathroom

Last modified on: 25/08/2026

How to clean extractor fan grease and dust safely depends on the fan type, the removable parts named in its manual and a reliable way to isolate the electrical supply. A cooker hood usually needs grease-filter care, whereas a bathroom fan collects dry dust around a grille and housing. Neither job should involve spraying liquid into the motor, opening fixed wiring or reaching into the duct.
Key takeaways
- Match the method to the fan and filter type before choosing a product or removing a part.
- Treat electrical isolation as a separate safety step, not as the same thing as pressing the fan’s off button.
- Keep moisture on the cloth or in the sink, away from fixed electrical components and the duct opening.
- Wash metal mesh or plastic covers only when the model instructions permit it; replace a filter when it is not designed to be washed.
- Separate visible soil from faults. Cleaning can remove grease and dust; it cannot repair wiring, a motor or damaged ventilation.
Table of Contents
How to clean extractor fan safely: identify the type first
The word extractor covers several appliances. The visible grille can look simple even when the filter, motor and duct arrangement behind it differ. Check the rating label or model number, then find the manufacturer’s cleaning instructions before releasing clips or screws.
| Fan or filter type | Soil usually visible | Reasonable DIY scope | Stop point |
|---|---|---|---|
| Cooker hood with metal mesh grease filter | Sticky cooking residue and dust | Exterior, accessible underside and removable washable filter, following the manual | Loose wiring, damaged clips, inaccessible fan or grease inside ducting |
| Recirculating cooker hood with carbon filter | Grease on the pre-filter and retained odour | Clean the washable pre-filter and replace or regenerate carbon media only as specified | No model match, exhausted replace-only filter or persistent odour after correct replacement |
| Bathroom wall or ceiling extractor | Dry dust and lint around grille and accessible housing | Vacuuming, dry wiping and a separately washed removable grille where permitted | Fixed wiring, moisture inside the unit, loose mounting, noisy motor or inaccessible height |
| Inline, heat-recovery or commercial extraction | May not be visible at the room grille | Accessible grille dusting only where the manual allows | Internal unit, shared duct, commercial grease system or any work requiring dismantling |
A filter’s appearance does not prove that it is washable. Aluminium mesh, stainless mesh, paper, fabric and carbon media respond differently to heat, alkalinity and agitation. The manual also settles whether a metal filter may go in a dishwasher. If the model cannot be identified, use the least wet method on accessible exterior surfaces and leave internal work alone.
Write down the model and filter code before disposing of a used insert. A replacement that fits the opening may still have the wrong material or airflow specification for the appliance. Match the code through the manufacturer or an authorised parts source. If a rented property has no manual, ask the landlord or managing agent for the appliance information rather than selecting a filter by dimensions alone.
Plan Your End of Tenancy Clean
Enter your postcode to view our rates and availability in your area.

Isolate the power before a cover comes off
Let a cooker hood, lamps and the hob below it cool. Clear pans, food and loose items from the work area. For a bathroom fan, dry the floor and keep wet cloths and water containers away from the unit.
Use the model instructions and the property’s electrical arrangement to identify the correct isolator, fused connection or circuit. Do not assume that a speed control, light switch or pull cord has made internal parts electrically safe. If the correct isolation point is uncertain, or access exposes wiring, stop and use a qualified electrician or appliance engineer.
Photograph the fitted position of each removable filter or grille before releasing it. Support the part with one hand so a spring clip does not drop it onto the hob, basin or floor. A stable platform is needed for high access; stretching from a bath edge, worktop or chair turns a cleaning task into a fall risk.

Clean a cooker hood without driving grease into the unit
Cooking vapour carries fine grease that settles on the hood and traps dust. Water alone tends to move this film around. A compatible washing-up liquid or labelled kitchen degreaser works because surfactants help separate oily soil from the surface. The chemistry is explained in more detail in how detergents work.
1. Remove loose soil and the permitted filters
With the supply isolated, vacuum or wipe loose dust from the exterior and underside. Release only the grease tray, mesh panel or filter described as removable in the manual. Place it flat in a lined sink or tray. Do not balance soft mesh against a tap, where the frame can bend.
2. Follow the filter instructions
For a hand-washable metal filter, use the water temperature and product allowed by the maker. Warm water and a measured amount of washing-up liquid are often enough for routine grease. Give the detergent its labelled contact time, then use a soft nylon brush in the mesh direction. Avoid boiling water, metal scourers and aggressive scraping, which can distort mesh or damage coatings.
Dishwasher advice is model-specific. Heat and alkaline dishwasher detergent can darken aluminium or affect finishes even when grease is removed. A carbon filter is commonly a replacement part, although some models use regenerable media. Do not wash it because it looks similar to a washable panel.
3. Wipe the hood by finish
Put product on a cloth, not into the hood. Work on small sections and keep liquid out of seams, buttons, lamps, vents and the motor opening. Stainless steel usually benefits from a soft cloth moved with the visible grain. Painted, coated, glass and aluminium surfaces need their own permitted product and a hidden-area test. Abrasive powders can dull or scratch some finishes; check the separate list of surfaces damaged by baking soda before reaching for a household powder.
4. Rinse residue and dry every removable part
Where the care instructions call for rinsing, remove detergent from the filter and dry it in a supported position. Wipe the hood with a clean, well-wrung cloth if the product label requires residue removal, then dry the accessible surface. Refit the filter in the photographed orientation only after water has left the mesh, frame and clips.

Read the result: cleanable soil or a fault?
| What you notice | Likely cleaning decision | When cleaning should stop |
|---|---|---|
| Greasy mesh and a normally running fan | Clean or replace the filter according to its model instructions | Mesh is torn, frame is bent or the correct filter cannot be identified |
| Sticky buttons or greasy exterior | Use a compatible product on a cloth and keep seams dry | Control is loose, cracked or liquid has entered it |
| Persistent weak extraction after a clean filter is fitted | Check that the filter is seated correctly and visible room-side vents are clear | Suspect a motor, duct, installation or airflow fault |
| Burning smell, heat, sparks or abnormal noise | Switch off and isolate the supply | Do not restart for testing; arrange qualified inspection |
Heavy grease elsewhere in the cooking zone may need its own sequence. The separate guide to oven cleaning mistakes covers heat, incompatible products and residue without turning the extractor method into a whole-kitchen clean.
You may also enjoy:
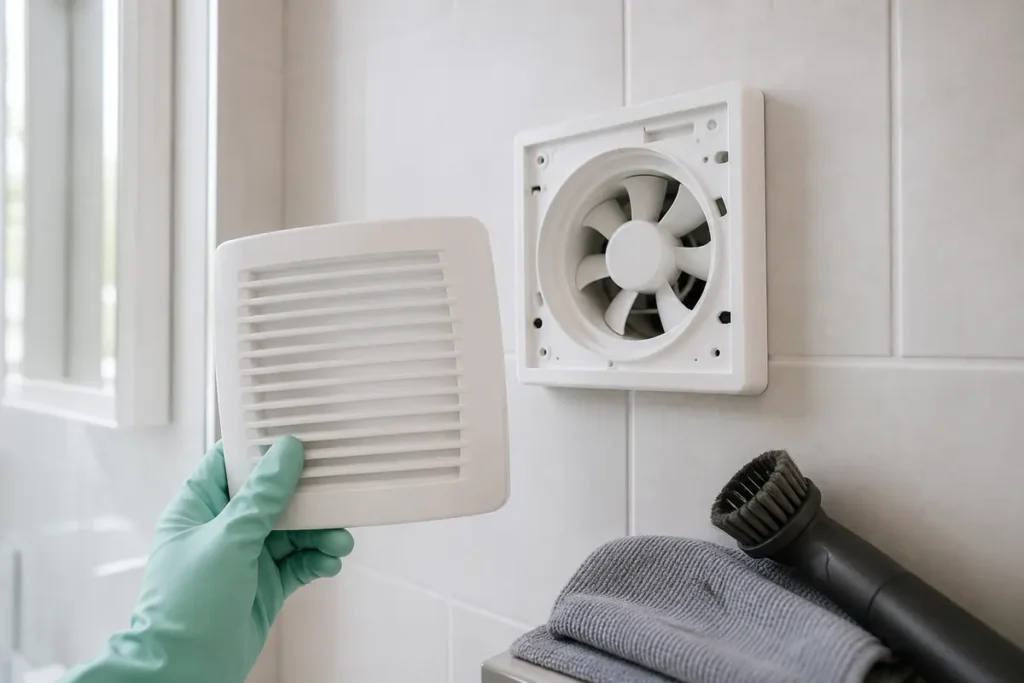
Clean a bathroom extractor fan with minimal moisture
Bathroom fans usually collect dry lint and dust at the grille. Condensation can make that layer cling. The presence of moisture is a reason to use less liquid around the fixed unit. Work only when the room and your hands are dry and the electrical supply has been correctly isolated.
- Vacuum the face of the grille with a soft brush attachment before removal. This limits loose dust falling into the room or deeper into the opening.
- Release the cover only by the method shown for that model. Some covers pull forward, some use spring clips and others have screws. Do not lever brittle plastic away from the wall.
- Vacuum accessible dry dust from the housing and keep the nozzle clear of wiring and fragile parts. Do not press, bend or spin the fan blades.
- Wash the detached plastic grille separately in mild soapy water only if its instructions allow it. Rinse where directed and leave it to dry completely.
- Use a dry microfibre cloth, or a barely damp cloth where permitted, on accessible non-electrical housing. Never spray cleaner at the fan.
- Refit the dry grille without pinching cables or forcing clips. Restore power and observe from a safe position. Stop if the fan hesitates, rattles, smells hot or fails to run.
Dark marks around a bathroom grille are not automatically surface dirt. Repeated condensation, a loose duct, cold bridging or a fan that runs for too short a period can leave the area damp. Clean accessible residue, then deal with the cause through the landlord, manufacturer, electrician or ventilation specialist. Do not paint over damp marks or put mould treatment into the fan opening.
After refitting the grille, check the room-side airflow without putting fingers, tissue or tools through the slots. A grille that sits unevenly may indicate a trapped clip or cable, so isolate the supply again before correcting it. If steam still lingers unusually long, an open window or door does not prove the fan is working correctly; report the ventilation problem for inspection.
Choose products by surface and soil
More product does not mean faster degreasing. A measured, labelled product gives you usable instructions for dilution, contact time, rinsing, ventilation and compatible surfaces. Keep the original container nearby and follow the wider rules for the safe use of cleaning chemicals.
| Task | Low-risk starting point | Avoid |
|---|---|---|
| Routine grease on a washable metal filter | Maker-approved warm water and washing-up liquid or compatible degreaser | Boiling water, metal scourers and unlabelled mixtures |
| Stainless hood exterior | Soft cloth and finish-compatible cleaner, moved with the grain | Abrasive powders, excess liquid and rubbing across the grain |
| Painted or coated hood | Hidden-area test with a mild permitted cleaner | Strong solvents, long wet contact and rough pads |
| Bathroom plastic grille | Dry vacuuming, then mild soapy water only when the detached part is washable | Hot water, bleach mixtures and wet cleaning while fitted |
| Motor, wiring, lights, controls or duct | No household wet-cleaning method | Sprays, soaked cloths, brushes pushed into the opening and DIY dismantling |
Use condition and the manual to set the cleaning interval
A universal monthly or quarterly rule ignores cooking frequency, fan size, filter type and bathroom humidity. Inspect the visible grille and cooker-hood filter regularly, then use the manufacturer’s interval as the baseline. Shorten the interval when grease reaches the filter quickly or dust visibly narrows the grille openings. Do not wait for a motor noise or burning smell before checking.
- Run the cooker hood during cooking and for the model’s recommended period afterwards.
- Wipe fresh splashes from the compatible hood exterior after it has cooled.
- Record the date and model code when a replace-only carbon filter is changed.
- Keep bathroom air paths open, report persistent condensation or weak airflow and do not mask the mark.
- Check that refitted filters sit flat and clips engage without force.
End of tenancy extractor fan cleaning: evidence and limits
At the end of a tenancy, compare the extractor with the check-in inventory, dated photographs and any manufacturer information left at the property. The practical target is documented cleanliness of accessible parts in line with the property’s starting condition, allowing for fair wear and any recorded fault. A clean extractor cannot promise a particular deposit outcome.
- Photograph grease, dust, damage and the fitted filter before work begins.
- Keep a note or receipt if the correct replace-only filter is supplied.
- Photograph the dry, reassembled fan and the surrounding wall or cabinet afterwards.
- Report a broken switch, loose cover, damaged cable, abnormal noise or ineffective extraction. Do not hide a fault with cosmetic cleaning.
- Leave inaccessible ductwork, commercial grease systems and electrical repair to the appropriate contractor.
Extractor work also sits within the wider kitchen sequence. Separate cloths and sensible task order matter around food areas; the guide to kitchen food safety covers worktops, handles and cross-contamination without suggesting that a domestic clean replaces commercial food-safety controls.
When the extractor belongs in a professional tenancy clean
Samyx Cleaning can include agreed, safely accessible cleaning tasks within an end of tenancy clean in London. Confirm the cooker-hood or bathroom-fan scope when booking, especially where a filter is removable, a replacement part may be needed or access is high. The cleaning team can work on suitable accessible surfaces within the agreed job; electrical repair, motor or duct dismantling, ventilation diagnosis and specialist commercial extraction are separate trades.
Before the visit, identify the model if possible, leave the manual and replacement filter available, clear the hob or bathroom area and report known faults. That preparation lets the cleaner distinguish removable soil from a problem that should be documented and referred.
Book End of Tenancy Cleaning
Enter your postcode to view our rates and availability in your area.
Frequently asked questions
-
How often should extractor fans be cleaned?
Use the manufacturer’s interval and the visible condition of the grille or filter. Cooking frequency, filter type, grease load and bathroom humidity change the timing. Inspect regularly and act before openings narrow, grease drips or the fan’s sound changes.
-
Can extractor fan filters go in the dishwasher?
Only when the instructions for that exact filter permit it. Dishwasher heat and alkaline detergent can discolour aluminium or affect coatings. Carbon, paper and fabric filters may be replace-only, so appearance alone is not a reliable test.
-
How do I clean a bathroom extractor fan without removing it?
After correctly isolating the electrical supply, vacuum the fitted grille with a soft brush and wipe the accessible exterior with a dry or barely damp cloth if the manual allows it. Do not spray the unit or push tools through the slots. Internal dust or a fixed cover needs model-specific or professional attention.
-
Can I clean inside extractor fan ducting myself?
Routine household cleaning should stop at accessible, manufacturer-approved parts. Ductwork may contain electrical components, sharp edges, inaccessible grease or a shared ventilation route. Persistent blockage, odour or weak airflow needs the landlord, manufacturer or a suitable ventilation contractor.
Important: Follow the cleaning-product label and the extractor manufacturer’s care and isolation instructions over general guidance. Patch-test compatible cleaners on a hidden area where a finish may vary, use the stated ventilation and protective equipment, rinse where directed and let every removable part dry fully. Never mix cleaning products, including bleach with ammonia, acids or other cleaners. Stop if metal, paint, coating or plastic discolours, dulls, warps or changes texture, or if the fan is loose, damaged, hot, noisy or electrically uncertain. Valuable, unfamiliar or damaged appliances need manufacturer or qualified professional advice before cleaning continues.
Author: Svetlana Georgieva (Clara)
Hi, I’m Svetlana Georgieva, but you can call me Clara. As the co-founder and heart behind Samyx Cleaning, I’m devoted to sharing the art of a clean space. Let’s journey into a cleaner, more joyful life together with tips from London's cleaning experts.

Discover more of our cleaning secrets: